
HYEWON JUNG의 개발일지
20240115 TIL supabase quill 연결, file upload, html조건부파싱 본문
목표
- supabase storage post bad request 400 / 403 해결하기
- 첨부파일 업로드하기
- 목록페이지 콘텐츠 편집
- 상세페이지 틀 만들기
새로 알게 된것/ 오늘의 코드
1. supabase storage post bad request 400 / 403 해결하기

코드상에 이상이 없는데도 계속 오류가 나고 있었다. 특히 unauthorized 오류의 경우 팀원분이 이미 해결한 오류라서 별 문제 없이 진행이 될 줄 알았다.
첫번째 팀원분이 했던 방법은
storage에 policy를 수정하는 것이었다.

스토리지에서 policies를 누른 뒤
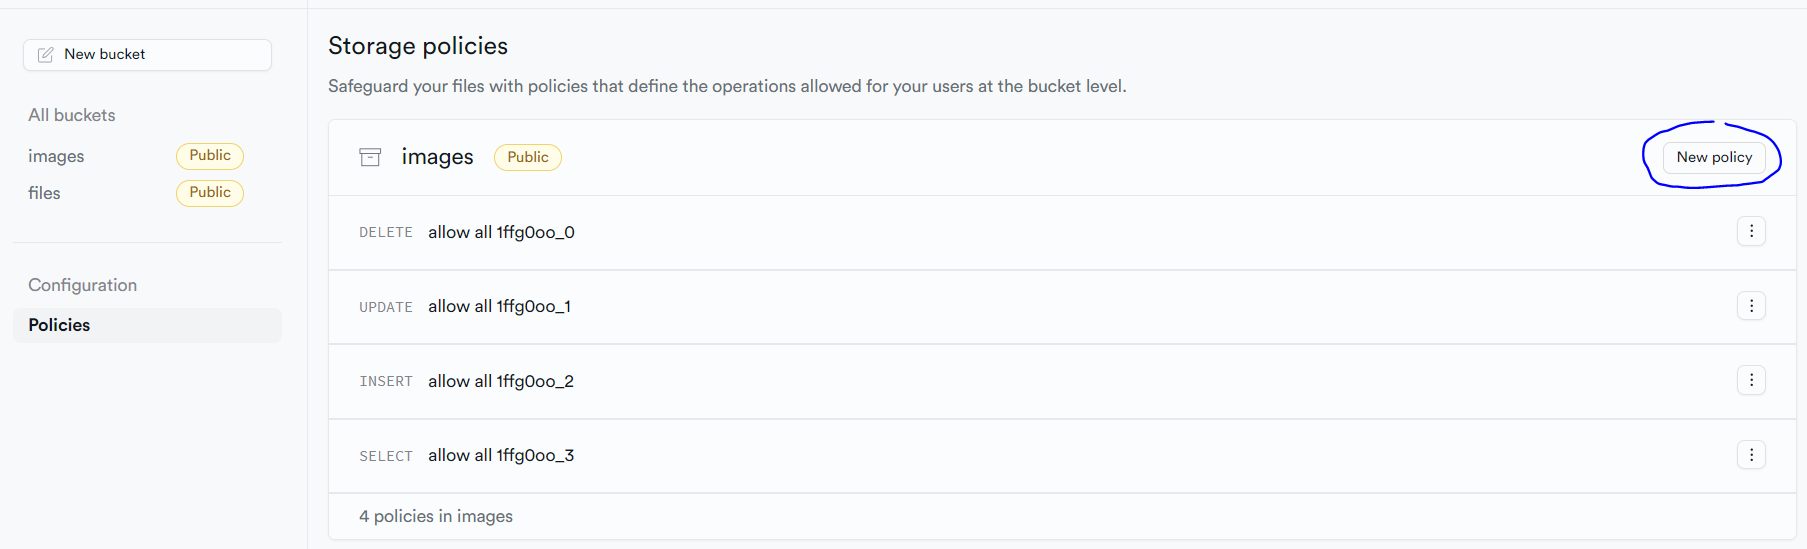
policy가 없는 경우 new policy를 눌러서 추가해주면 된다.

for full customization을 눌러서

이렇게 설정을 해주는 것이다.!
하지만.. 해결이 되지않았다.!
두번째 경로에 public 붙이기
        const { data, error } = await supabase.storage
          .from('images')
          .upload(`quill_imgs/${fileNewName}.png`, file);
        if (error) {
          console.error('이미지 업로드 중 오류 발생:', error);
        } else {
          console.log('이미지가 성공적으로 업로드되었습니다:', data);
        }
현재 경로에서
        const { data, error } = await supabase.storage
          .from('images')
          .upload(`public/quill_imgs/${fileNewName}.png`, file);
        if (error) {
          console.error('이미지 업로드 중 오류 발생:', error);
        } else {
          console.log('이미지가 성공적으로 업로드되었습니다:', data);
        }
이렇게 붙여주었다!
결과는 실패!
결국 시간을 더 소비할 순 없어서 튜터님께 찾아갔다.
결론은...
구현한 페이지에 로그인이 안되어있다~!~!~!
이런...
오류 이름이 unauthorized인 거에서 알았어야 했는데 팀원이 오류를 해결했다기에 그대로 할 생각만 했다..
생각해보면 해당 팀원은 기능 구현을 위해 로그인을 해둔 상태였다!
멀쩡하게 연결이 되었고 해결까지 완~!
전체 코드보기
 // 에디터 접근을 위한 ref return
  const quillRef = useRef<ReactQuill | null>(null);

  const imageHandler = () => {
    try {
      //  이미지를 저장할  DOM
      const input = document.createElement('input');
      // 속성 써주기
      input.setAttribute('type', 'file');
      input.setAttribute('accept', 'image/*');
      input.click(); // 에디터 이미지버튼
      input.addEventListener('change', async () => {
        const file = input.files![0];
        const fileNewName = uuid();

        // console.log(fileNewName);
        // file을 서버에 업로드
        const { data, error } = await supabase.storage
          .from('images')
          .upload(`quill_imgs/${fileNewName}.png`, file);
        if (error) {
          console.error('오류 발생:', error);
        } else {
          console.log(' 성공적 업로드', data);
        }
        // 업로드된 이미지의 URL을 요청
        const response = supabase.storage
          .from('images')
          .getPublicUrl(`quill_imgs/${fileNewName}.png`);
        console.log(response);
        if (response.data) {
          const postImageUrl = response.data.publicUrl;
          console.log(response.data.publicUrl);
          // const editor = quillRef.current!.getEditor();
          const editor = quillRef.current?.getEditor();
          const range = editor?.getSelection(true);

          //마우스 위치에 이미지를 넣고 다음 으로 커서 옮기기
          editor?.insertEmbed(range?.index || 0, 'image', postImageUrl);
          if (mainImage === '') {
            setMainImage(postImageUrl);
          }
          editor?.setSelection((range?.index || 0) + 1, 0);
        } else {
          console.error('No public URL found in response data.');
        }
      });
    } catch (error) {
      console.log('error', error);
    }
  };

  // 에디터 설정
  const modules = React.useMemo(
    () => ({
      // 툴바 설정
      toolbar: {
        container: [
          [{ header: [1, 2, 3, 4, 5, 6, false] }], // header 설정
          ['bold', 'italic', 'underline', 'strike', 'blockquote'], // 굵기, 기울기, 밑줄 등 부가 tool 설정
          [
            { list: 'ordered' },
            { list: 'bullet' },
            { indent: '-1' },
            { indent: '+1' }
          ], // 리스트, 인덴트 설정
          ['image', 'video'], // 링크, 이미지, 비디오 업로드 설정
          [{ align: [] }, { color: [] }, { background: [] }] // 정렬, 글자 색, 글자 배경색 설정
          // ["clean"], // toolbar 설정 초기화 설정
        ],

        // 핸들러 설정
        handlers: {
          image: imageHandler // 이미지 핸들러 설정
        }
      }
    }),
    []
  );

  // 툴바에 사용되는 툴 포맷
  const formats = [
    'header',
    'bold',
    'italic',
    'underline',
    'strike',
    'blockquote',
    'list',
    'bullet',
    'indent',
    'video',
    'image',
    'align',
    'color',
    'background'
  ];

  return (
  <ReactQuill
            style={{ height: '600px', marginBottom: '30px' }}
            ref={quillRef}
            value={content}
            onChange={setContent}
            modules={modules}
            formats={formats}
            theme="snow"
          />

  )
2.첨부파일 업로드하기
<input type="file" onChange={handleFiles} multiple />인풋 먼저 만들어주기
파일을 여러개를 한번에 추가할 수 있어야하고 파일을 supabase storage에 담아서 url을 받아와야한다.
   const [files, setFiles] = useState<File[]>([]);
  const [uploadedFileUrl, setUploadedFileUrl] = useState<string | null>(null);
 const handleFiles = async (e: React.ChangeEvent<HTMLInputElement>) => {
    const fileList = e.target.files;
    if (fileList) {
      const filesArray = Array.from(fileList);//파일 목록을 배열로 변환합니다.
      // 각 파일을 개별적으로 처리 (필요한 경우)
      filesArray.forEach((file) => {
        handleFilesUpload(file);
      });
    }
  };
  const handleFilesUpload = async (file: File) => {
    try {
      // const newFileName = uuid();
      const { data, error } = await supabase.storage
        .from('files')
        .upload(`files/${file.name}${uuid()}`, file);
      if (error) {
        console.log('파일 안올라감ㅋ', error);
        return;
      }
      const res = supabase.storage.from('files').getPublicUrl(data.path);
      setFiles((prevFiles) => [...prevFiles, file]);// 아예 바꾸는 게 아니라 추가
      setUploadedFileUrl(res.data.publicUrl);
      // file 객체를 저장하도록 수정
      console.log(res.data.publicUrl);
    } catch (error) {
      console.error('Error handling file upload:', error);
    }
  };
이렇게 설정을 해주었다.
supabase는 같은 값의 파일이 들어오면 upload를 거부한다. 그래서 파일명 빼고 추가로 변경을 줄 값이 필요했다. 그래서 upload를 uuid를 붙여서 진행한 것이다!
files 에는 파일배열을 담고, uploadedFileUrl 은 storage에서 받은 url을 담는 곳이다.
그리고 url을 string으로 담은 배열보다 이름과 url을 담을 수 있는 객체 배열이 나을 것 같다고 판단해서
  const { data, error } = await supabase.from('community').insert([
        {
          title,
          content,
          category,
          post_user: 'sweetPotato', //우선 고정값
          nickname: 'goguma',
          files: files.map((file) => ({
            name: file.name,
            url: uploadedFileUrl
          })),
          main_image: mainImage
        }
      ]);
files에는 이렇게 값을 담아줬다.
3.목록페이지 콘텐츠 편집
quill을 사용하면 이렇게 content가 생기는데 html 파싱을 따로 해줘야한다.
"<p>ㅋㅋ 첫 사진이 들어와야하는데 마지막 사진이 나올듯 ㅋㅋ</p>
<p><img src="https://ahhyzbgcyoyfrzmvrgce.supabase.co/storage/v1/object/public/images/quill_imgs/3073e9f4-413e-4220-93d3-520d5f7a2b93.png"></p>
<p><img src="https://ahhyzbgcyoyfrzmvrgce.supabase.co/storage/v1/object/public/images/quill_imgs/0b5495b8-1bae-4519-ae73-43cd458cb222.png"></p>
<p><br></p>
<p>사진 크기 왜이래</p>
<p><img src="https://ahhyzbgcyoyfrzmvrgce.supabase.co/storage/v1/object/public/images/quill_imgs/57304c66-a467-48ef-8e8b-861dfdcfb1db.png"></p>"
react-quill을 사용해서 얻은 html 은 문자열안에 html으로 담기기때문에 보여줄때는 html-parsing을 해야한다.
내가 선택한 방법은 html-react-parser를 사용하는 것이다.
보안을 위해서 Dompurify를 같이 사용하는 것이 좋다고 한다.
사용법은 정말 간단하다
yarn add html-react-parser
를 해주고
import parse from 'html-react-parser';

 <Content>{parse(post.content)}</Content>
parse를 임포트 해와서 콘텐츠를 넣어주면된다.
근데 나같은 경우에 컨텐츠의 문자만 빼와서 메인에서 일부만 보여줬어야했는데 여러 방법을 생각하다 퀼이 주는 결과가 문자열인 것을 이용해서 정규식으로 태그들을 전부 없애줬다. 가독성이 떨어지지만 가장 간단한 방법이라고 생각했다.
  const handleText = (content: string): string => {
    // 정규 표현식을 사용하여 태그를 제외한 텍스트만 추출
    const textOnly = content.replace(/<[^>]*>/g, '');

    return textOnly;
  };

  return(
  <Post_content>{handleText(post.content)}</Post_content>
  )
함수를 만들어서 처리해줬다.
<Post_content>{post.content.replace(/<[^>]*>/g, '')}</Post_content>사실 이렇게 적어줘도 된다. 하지만 코드의 가독성과 유지보수를 고려하면 함수를 사용하는 것을 권장한다!
4. 상세페이지 구현
사실 아직 틀만 구현해서 크게 새로운 것은 없다!
목표 달성여부
supabase storage post bad request 400 / 403 해결하기첨부파일 업로드하기목록페이지 콘텐츠 편집상세페이지 틀 만들기
all clear
내일 목표
- 유저정보 연결하기
- 상세페이지 구현
- 익명으로 작성하기 구현
- 카테고리 filter 추가
- 트러블 슈팅 정리하기
- quill vs react-draft-wysiwyg 비교 추가
'개발일지' 카테고리의 다른 글
| 20240117 TIL react-quill에 html넣기/ html 파싱하기/컴포넌트 분리하기 (1) | 2024.01.18 |
|---|---|
| 20240116 TIL react-quill image resize @xeger/quill-image-formats/actions (0) | 2024.01.17 |
| 20240112~15 TIL react-draft-wysiwyg와 quill 비교하기 (1) | 2024.01.15 |
| 20240111 TIL react-draft-wysiwyg 첫적용 (0) | 2024.01.12 |
| 20240110 TIL supabase storage (0) | 2024.01.11 |


